728x90
반응형
UITableView
- 데이터를 목록형태로 보여줄수 있는, 가장 기본적인 UI컴포넌트

UITableView Delegate 프로토콜 채택 및 UITableView DataSource 를 이용해서 구현해야 한다.
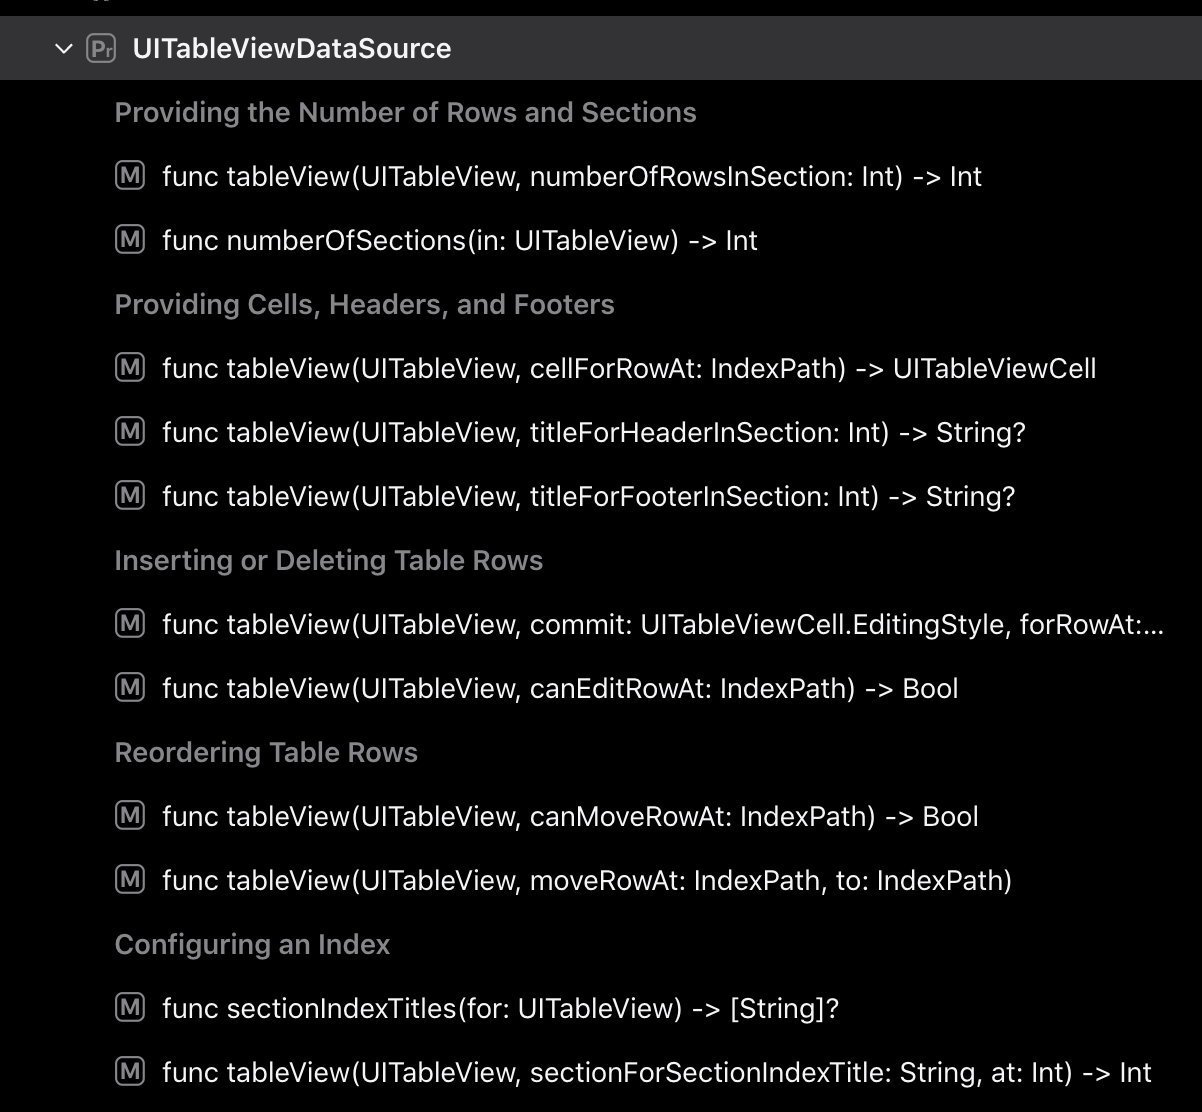
UITableView DataSource
- 데이터를 받아 뷰를 그려주는 역할
- 테이블 뷰를 생성하고 수정하는데 필요한 정보를 테이블 뷰 객체에 제공
< 속성 메서드 >
https://developer.apple.com/documentation/uikit/uitableviewdatasource
Apple Developer Documentation
developer.apple.com
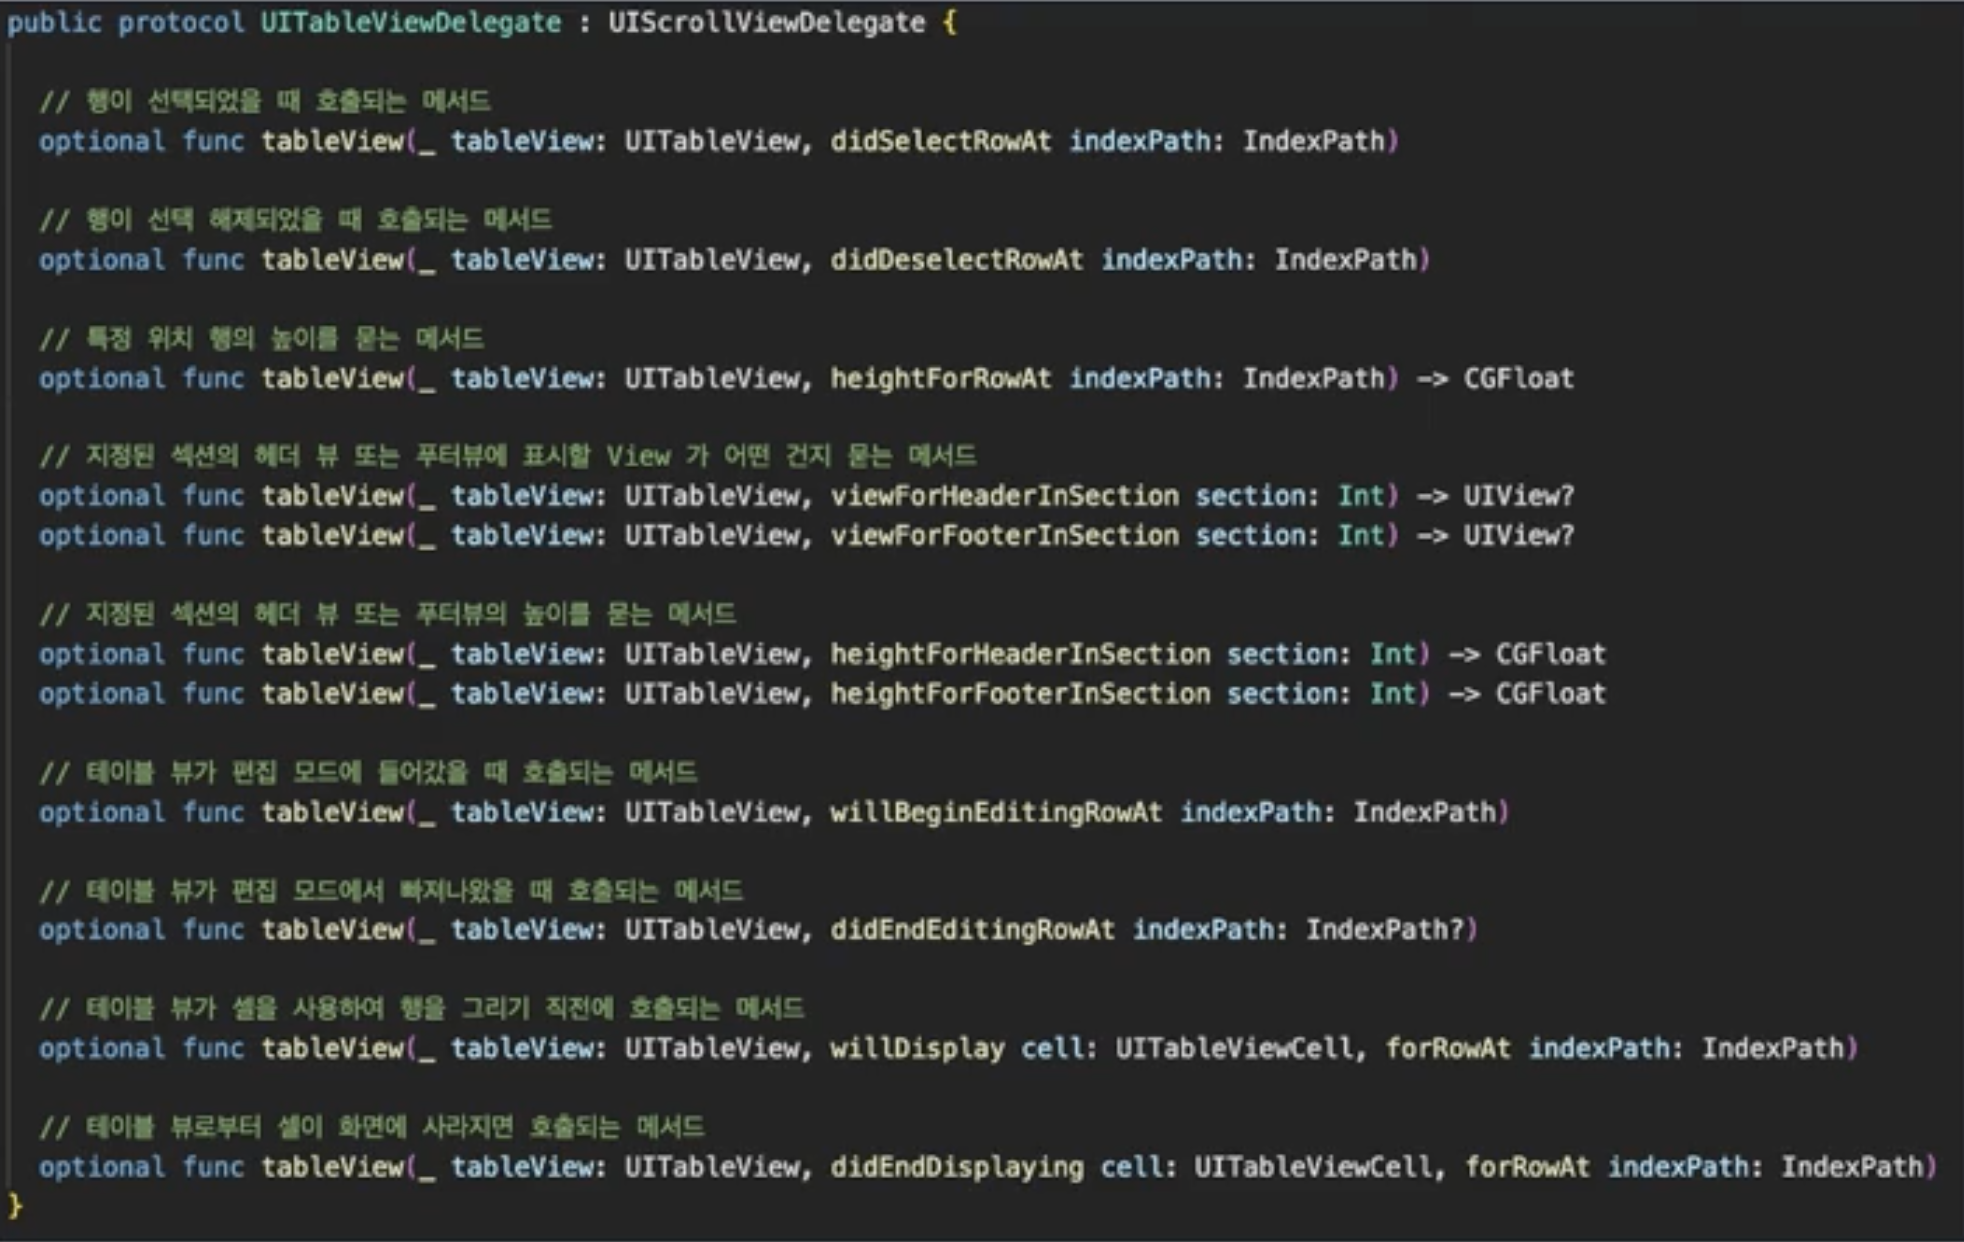
UITableView Delegate
- 테이블 뷰의 시각적인 부분을 설정
- 행의 액션 관리
- 엑세서리 뷰 지원
- 테이블 뷰의 개별행 편집을 도와줌
실습
화면 구성
1. 프로젝트 생성
2. navigation controller 추가
3. 진입점 변경 및, 연결 root view controller
4. bar 에 버튼 두개 추가 ( System item Edit, Add 설정 )
5. TableView 추가 constraint 조건 설정 ( 0,0,0,0 )
6. TableView Inspector 의 prototype Cell 1 로 변경
7. Cell 선택후 style 을 Basic 으로 함.
기능 구현 1. ( 알럿 )
< 액션 시트와 알럿 비교 >

<소스 >
import UIKit

class ViewController: UIViewController {

    @IBOutlet weak var tableView: UITableView!


    override func viewDidLoad() {
        super.viewDidLoad()
        // Do any additional setup after loading the view.
    }


    @IBAction func tabEditBtn(_ sender: UIBarButtonItem) {
    }

    @IBAction func tabAddBtn(_ sender: UIBarButtonItem) {

        let alert  = UIAlertController(title: "할 일 등록", message: nil, preferredStyle: .alert)

        // 등록 버튼 ( 타이틀, 내용, 이벤트 클로저 )
        let regiBtn = UIAlertAction(title: "등록", style: .default, handler: { _ in

            // 텍스트 필드에 입력된 값 가지고 오기
            let todoContent = alert.textFields?[0].text
            debugPrint(todoContent)
            // print("등록 \(todoContent)")

        })

        // 취소 버튼
        let cancelBtn = UIAlertAction(title: "취소", style: .cancel, handler: nil)

        // alert에  버튼 추가
        alert.addAction(cancelBtn)
        alert.addAction(regiBtn)

        // alert에 텍스트필 추가 ( 텍스트 필드에 대한 config 를 정의 해줘 야 한다 . )
        alert.addTextField(configurationHandler: { textfield in

            textfield.placeholder = "할 일 입력"

        })

        // alert 보이기
        self.present(alert, animated: true, completion: nil)

    }

}
테이블 뷰 전체 소스
//
//  ViewController.swift
//  FastCampers_TodoList
//
//  Created by Woong on 2022/06/10.
//

import UIKit

class ViewController: UIViewController {

    @IBOutlet weak var tableView: UITableView!

    var tasks = [Task]()


    override func viewDidLoad() {
        super.viewDidLoad()
        // Do any additional setup after loading the view.

        self.tableView.dataSource = self
    }


    @IBAction func tabEditBtn(_ sender: UIBarButtonItem) {
    }

    @IBAction func tabAddBtn(_ sender: UIBarButtonItem) {

        let alert  = UIAlertController(title: "할 일 등록", message: nil, preferredStyle: .alert)

        // 등록 버튼 ( 타이틀, 내용, 이벤트 클로저 )
        let regiBtn = UIAlertAction(title: "등록", style: .default, handler: { [weak self] _ in
            // 텍스트 필드에 입력된 값 가지고 오기
            guard let title = alert.textFields?[0].text else{return}
            let tesk  = Task(title: title, done: false)
            self?.tasks.append(tesk)

            // 갱신
            self?.tableView.reloadData()

            // debugPrint(todoContent)
            // print("등록 \(todoContent)")

        })

        // 취소 버튼
        let cancelBtn = UIAlertAction(title: "취소", style: .cancel, handler: nil)

        // alert에  버튼 추가
        alert.addAction(cancelBtn)
        alert.addAction(regiBtn)

        // alert에 텍스트필 추가 ( 텍스트 필드에 대한 config 를 정의 해줘 야 한다 . )
        alert.addTextField(configurationHandler: { textfield in

            textfield.placeholder = "할 일 입력"

        })

        // alert 보이기
        self.present(alert, animated: true, completion: nil)

    }

}

extension ViewController: UITableViewDataSource {

    //UITableViewDataSource 프로토콜을 사용하려면 아래의 두개 함수를 꼭 정의 해줘야 한다.

    func tableView(_ tableView: UITableView, numberOfRowsInSection section: Int) -> Int {
        // 각 섹션에 표시할 행의 갯수
        return self.tasks.count
    }

    func tableView(_ tableView: UITableView, cellForRowAt indexPath: IndexPath) -> UITableViewCell {

        // 스토리보드에서 구현된 셀을 가지고 오기
        // dequeueReusableCell 재사용 가능한 테이블 뷰를 가져옴 ( 메모리 낭비를 방지하기 위하여 셀을 재사용 )
        // Cell 은 스토리보드 셀의 id 값
        let cell = tableView.dequeueReusableCell(withIdentifier:  "Cell", for: indexPath)
        let task = self.tasks[indexPath.row]

        cell.textLabel?.text = task.title
        return cell
    }


}
728x90
반응형
'IOS' 카테고리의 다른 글
| IOS- URLSession (0) | 2022.06.21 |
|---|---|
| XX캠퍼스 강의 - ch08 _ 일기앱 만들기 UITabBarController, UICollectionView (0) | 2022.06.13 |
| XX캠퍼스 강의 - ch06 _ UIStackView, IBInspectable, IBDesignable (0) | 2022.06.09 |
| XX캠퍼스 강의 - ch05 _ NavigationController (0) | 2022.06.07 |
| XX캠퍼스 강의 - ch04 _ UIKit (0) | 2022.06.07 |