1. 카카오
1) 이동
https://github.com/react-native-seoul/react-native-kakao-login
GitHub - react-native-seoul/react-native-kakao-login: react-native native module for Kakao sign in.
react-native native module for Kakao sign in. Contribute to react-native-seoul/react-native-kakao-login development by creating an account on GitHub.
github.com
2) 설치
yarn add @react-native-seoul/kakao-login

pod install
3) ios 설정
- plist 설정
- URL Scheme 설정
- Legacy iOS SDK 불러오기
 <key>CFBundleURLTypes</key>
 <array>
+ <dict>
+   <key>CFBundleTypeRole</key>
+   <string>Editor</string>
+   <key>CFBundleURLSchemes</key>
+   <array>
+     <string>kakao{카카오 네이티브앱 아이디를 적어주세요}</string>
+   </array>
+ </dict>
 </array>
 <key>CFBundleVersion</key>
 <string>1</string>
+ <key>KAKAO_APP_KEY</key>
+ <string>{카카오 네이티브앱 아이디를 적어주세요}</string>
+ <key>LSApplicationQueriesSchemes</key>
+ <array>
+   <string>kakaokompassauth</string>
+   <string>storykompassauth</string>
+   <string>kakaolink</string>
+ </array>
3.0.0 버전부터는 swift 버전의 kakao sdk를 활용하므로 Swift Bridging Header를 추가해야할 수 있습니다.
Xcode not automatically creating bridging header?
I imported an Obj-C file into my swift project and Xcode automatically prompted me to create a bridging header file as expected. However, I deleted both the files (moved to trash) to make some chan...
stackoverflow.com
AppDelegate.m 파일에 해당 부분을 추가해주세요. 이는 카카오톡 앱이 깔려 있을시 올바로 데이터를 받아오기 위함입니다 #193.

- Import
#import <RNKakaoLogins.h>
- Implementation
- (BOOL)application:(UIApplication *)app
     openURL:(NSURL *)url
     options:(NSDictionary<UIApplicationOpenURLOptionsKey,id> *)options {
 if([RNKakaoLogins isKakaoTalkLoginUrl:url]) {
    return [RNKakaoLogins handleOpenUrl: url];
 }

 return NO;
}
Project => Targets 아래 앱 선택 => General 탭으로 이동해서 Bundle Identifier가 본인의 카카오 앱과 동일한지 확인해주세요.
3) android 설정
1. 키해시 등록
keytool -exportcert -alias androiddebugkey -keystore ~./android/app/debug.keystore -storepass android -keypass android | openssl sha1 -binary | openssl base642. build.gradle(Project)
// Top-level build file where you can add configuration options common to all sub-projects/modules.

buildscript {
    ext {
        buildToolsVersion = "30.0.2"
        minSdkVersion = 26
        compileSdkVersion = 31
        targetSdkVersion = 31
        ndkVersion = "21.4.7075529"
        kotlinVersion = '1.5.20'

    }
    repositories {
        google()
        mavenCentral()
    }
    dependencies {
        classpath("com.android.tools.build:gradle:4.2.2")
        classpath "org.jetbrains.kotlin:kotlin-gradle-plugin:$kotlinVersion"
    }
}

allprojects {
    repositories {
        mavenCentral()
        mavenLocal()
        maven {
            // All of React Native (JS, Obj-C sources, Android binaries) is installed from npm
            url("$rootDir/../node_modules/react-native/android")
        }
        maven {
            // Android JSC is installed from npm
            url("$rootDir/../node_modules/jsc-android/dist")
        }

        google()
        maven { url 'https://www.jitpack.io' }
        maven { url 'https://devrepo.kakao.com/nexus/content/groups/public/' }
    }
}
sdk 오류시 추가
maven { url 'https://devrepo.kakao.com/nexus/content/groups/public/' }
Manifest allowBackup을 true로 변경해주세요.
<application
    android:name=".MainApplication"
    android:allowBackup="true"
Redirect URI 설정
<activity android:name="com.kakao.sdk.auth.AuthCodeHandlerActivity"
    android:exported="true"
    >
    <intent-filter>
        <action android:name="android.intent.action.VIEW" />

        <category android:name="android.intent.category.DEFAULT" />
        <category android:name="android.intent.category.BROWSABLE" />

        <!-- Redirect URI: "kakao{NATIVE_APP_KEY}://oauth“ -->
        <data
            android:host="oauth"
            android:scheme="kakao75a68583ee9691afa24c662d053fa10a" />
    </intent-filter>
</activity>
----------------------------------------------------------------------------------------------------------------------
2. 구글
https://github.com/react-native-google-signin/google-signin
GitHub - react-native-google-signin/google-signin: Google Sign-in for your React Native applications
Google Sign-in for your React Native applications. Contribute to react-native-google-signin/google-signin development by creating an account on GitHub.
github.com
1. Firebase 프로젝트 생성
구글 로그인인증을 위해서 우선 새로운 Firebase 프로젝트와 그 안에 새로운 앱을 만들어줍니다.
1) 기존 Firebase 프로젝트가 없는 경우 Firebase 콘솔로 이동하여 이름을 지정하고 새 프로젝트를 생성합니다.

2) 새 앱을 만들어 프로젝트에 연결합니다.
프로젝트 대시보드에서 ios 버튼을 눌러 앱을 추가해보겠습니다.

앱 등록을 위해 시키는 대로 bundle_id와 앱 닉네임을 입력해줍니다.

다음 단계로 IOS

2. Firebase에서 Google 로그인 활성화
앱이 Firebase 프로젝트에 연결되었으므로 콘솔로 이동하여 앱이 Google 인증을 사용하도록 설정해야 합니다.
대시보드에 들어가서
Authentication → 로그인 방법 → Google에서 토글 버튼을 눌러 사용 설정을 활성화시켜줍니다.
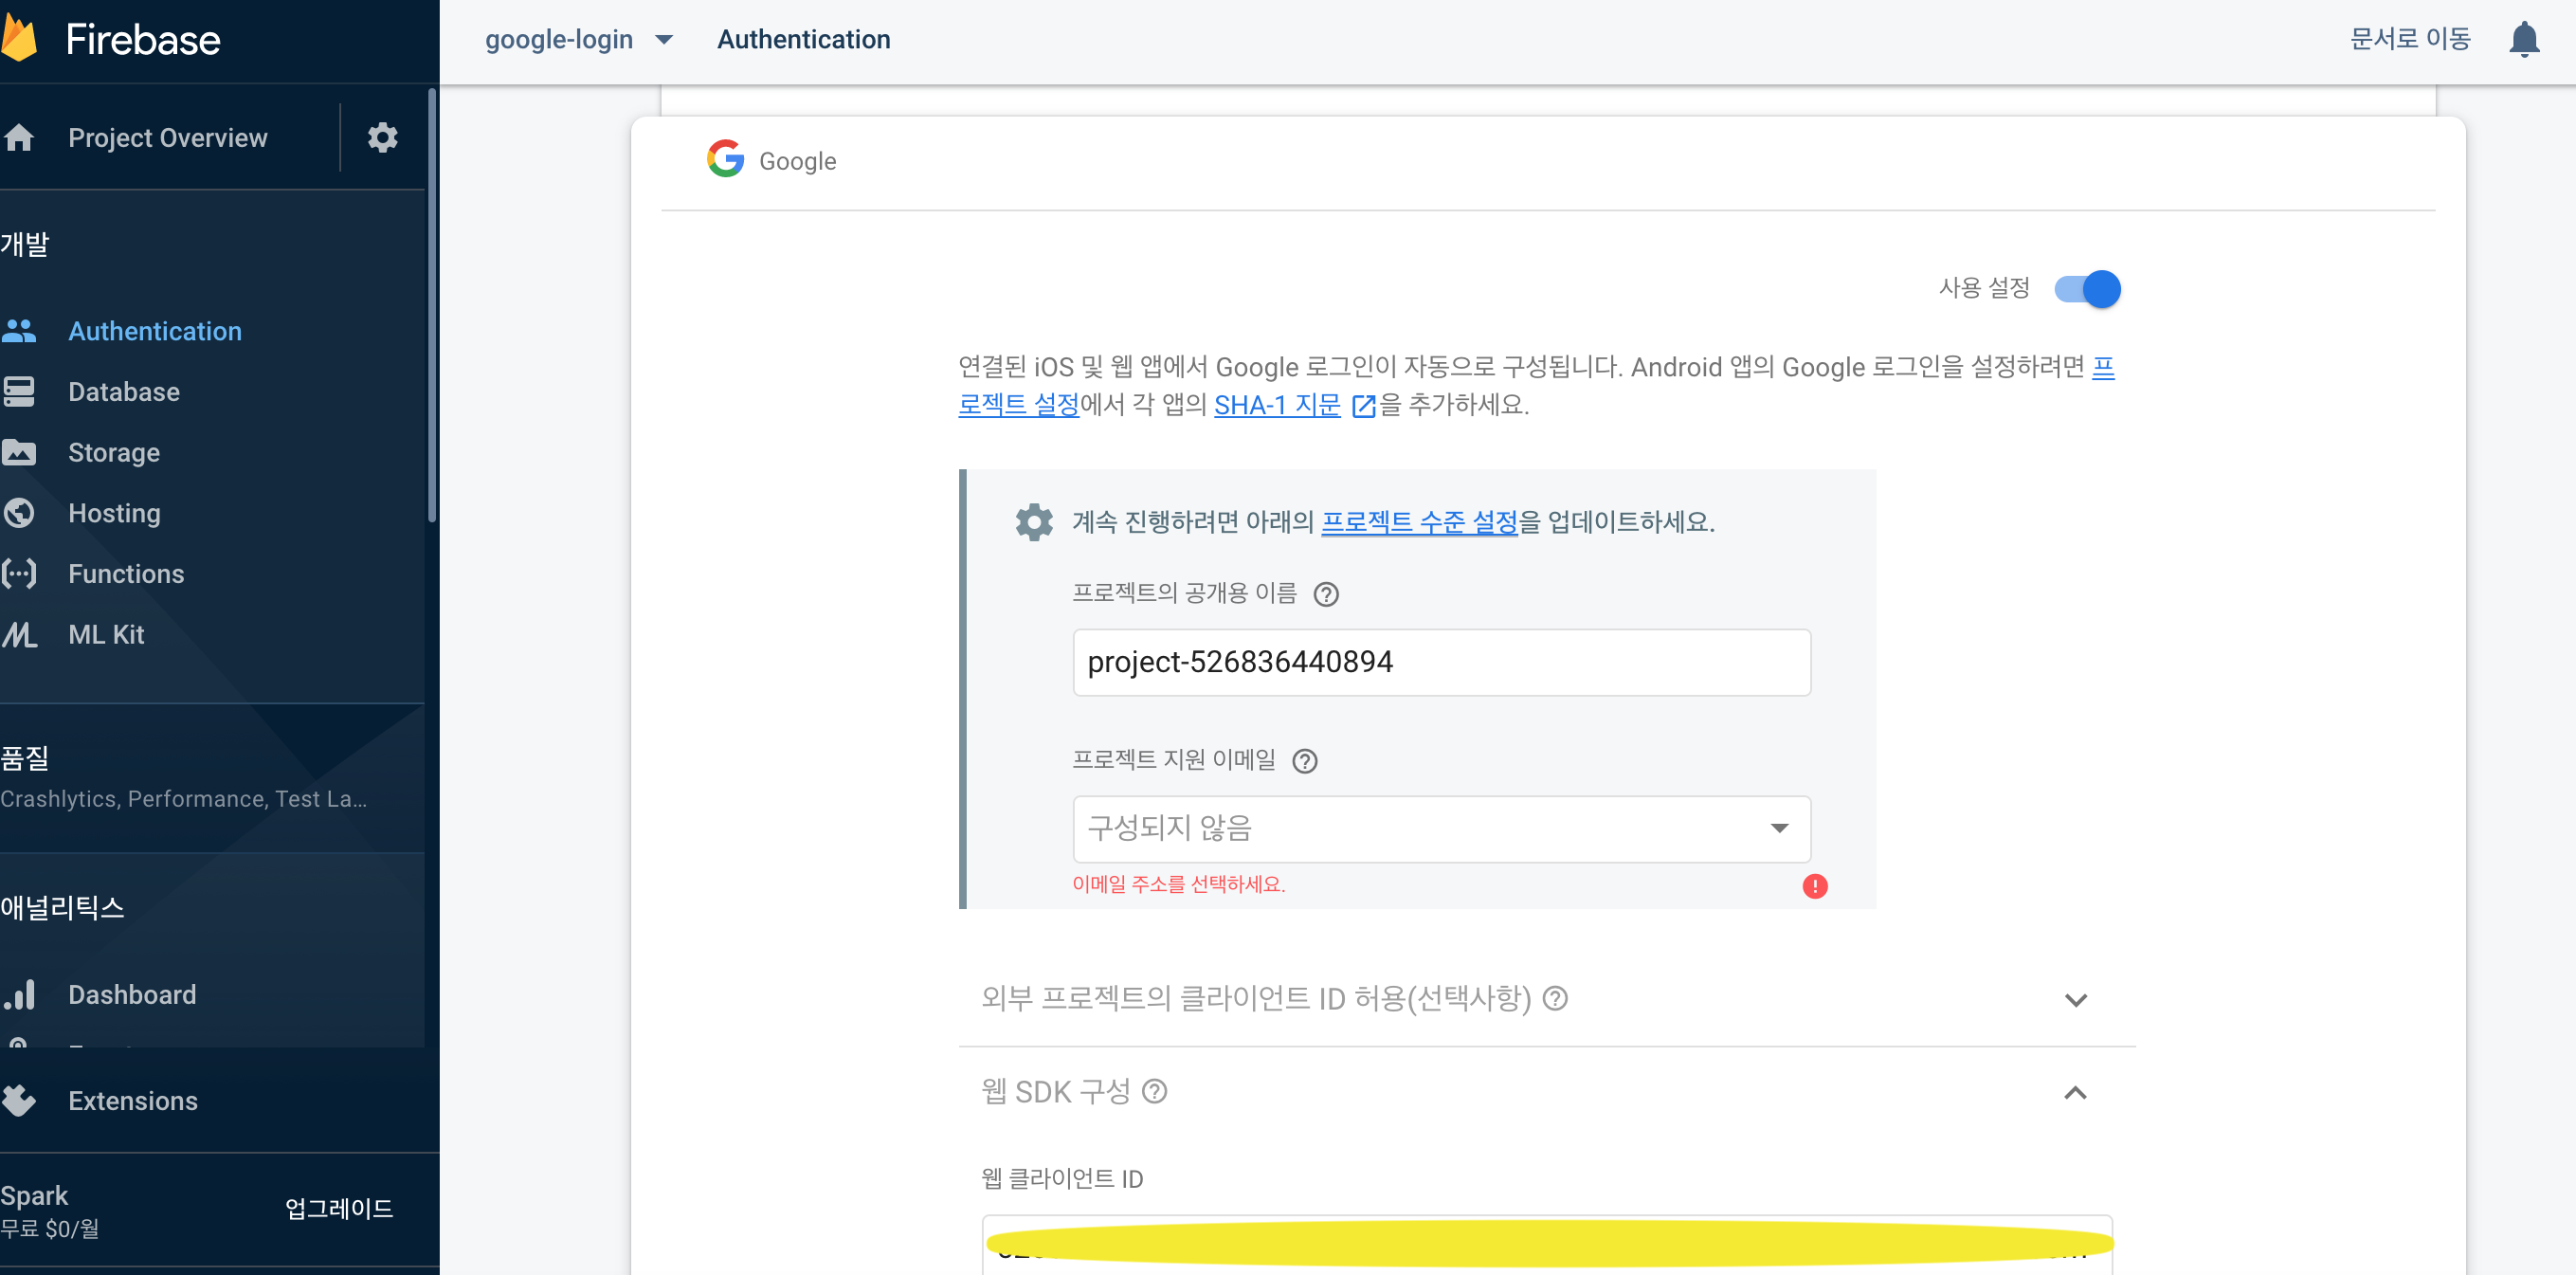
웹 클라이언트 ID는 나중에 쓰이니 따로 저장해둡니다.
3. google 로그인 패키지 설치
Google 로그인을 활성화하기 위해 react-native-google-signin 패키지를 설치해야 합니다.
게시물을 작성할 당시 React-Native 버전 0.61이었습니다.
1) 패키지 설치
RN >= 0.60의 경우
yarn add @react-native-community/google-signinor
npm install -save @react-native-community/google-signin
RN <= 0.59의 경우
yarn add react-native-google-signinor
npm install -save react-native-google-signin
※ 버전이 0.59 이하일 경우 iOS guide 를 보고 설정을 더 해주셔야 합니다.
2) pod파일 설치
cd ios
pod install
3) Xcode 구성
XCode에서 아래 이미지에 표시된 것처럼 URL 스키마에 REVERSED_CLIENT_ID(GoogleService-Info.plist 파일 안에 있음)을 추가합니다.

4. react-native 앱에서 로그인 기능 적용
1) 컴포넌트 추가
import { GoogleSignin, GoogleSigninButton, statusCodes } from '@react-native-community/google-signin';
2) 로그인 configure 설정
YOUR_WEB_CLIENT_ID_HERE에 전에 발급받은 웹 클라이언트 ID를 입력합니다.
  componentDidMount() {
    GoogleSignin.configure({
      webClientId: 'YOUR_WEB_CLIENT_ID_HERE',
      offlineAccess: true,
      hostedDomain: '',
      forceConsentPrompt: true,
    });
  }
3) 로그인 버튼
  <GoogleSigninButton
    style={{ width: 192, height: 48 }}
    size={GoogleSigninButton.Size.Wide}
    color={GoogleSigninButton.Color.Dark}
    onPress={this._signIn}
    disabled={this.state.isSigninInProgress} />
4) 로그인 함수
  _signIn = async () => {
    try {
      await GoogleSignin.hasPlayServices();
      const userInfo = await GoogleSignin.signIn();
      this.setState({ userInfo: userInfo, loggedIn: true });
    } catch (error) {
      if (error.code === statusCodes.SIGN_IN_CANCELLED) {
        // user cancelled the login flow
      } else if (error.code === statusCodes.IN_PROGRESS) {
        // operation (f.e. sign in) is in progress already
      } else if (error.code === statusCodes.PLAY_SERVICES_NOT_AVAILABLE) {
        // play services not available or outdated
      } else {
        // some other error happened
      }
    }
  };
5) 로그아웃 함수
  signOut = async () => {
    try {
      await GoogleSignin.revokeAccess();
      await GoogleSignin.signOut();
      this.setState({ user: null, loggedIn: false }); // Remember to remove the user from your app's state as well
    } catch (error) {
      console.error(error);
    }
  };
6) 전체 코드
import React, { Component } from 'react';
import { SafeAreaView, StyleSheet, View, Text, StatusBar, Button, Image } from 'react-native';
import { GoogleSignin, GoogleSigninButton, statusCodes } from '@react-native-community/google-signin';

class App extends Component {
  constructor(props) {
    super(props);
    this.state = {
      pushData: [],
      loggedIn: false
    }
  }

  componentDidMount() {
    GoogleSignin.configure({
      webClientId: '526836440894-d7kvi3jfopuq06jaunnqp6s10r570jel.apps.googleusercontent.com',
      offlineAccess: true,
      hostedDomain: '',
      forceConsentPrompt: true,
    });
  }

  _signIn = async () => {
    try {
      await GoogleSignin.hasPlayServices();
      const userInfo = await GoogleSignin.signIn();
      this.setState({ userInfo: userInfo, loggedIn: true });
    } catch (error) {
      if (error.code === statusCodes.SIGN_IN_CANCELLED) {
        // user cancelled the login flow
      } else if (error.code === statusCodes.IN_PROGRESS) {
        // operation (f.e. sign in) is in progress already
      } else if (error.code === statusCodes.PLAY_SERVICES_NOT_AVAILABLE) {
        // play services not available or outdated
      } else {
        // some other error happened
      }
    }
  };

  signOut = async () => {
    try {
      await GoogleSignin.revokeAccess();
      await GoogleSignin.signOut();
      this.setState({ user: null, loggedIn: false }); // Remember to remove the user from your app's state as well
    } catch (error) {
      console.error(error);
    }
  };

  render() {
    return (
      <View>
        <StatusBar barStyle="dark-content" />
        <SafeAreaView>
          <View style={styles.sectionContainer}>
            <GoogleSigninButton
              style={{ width: 192, height: 48 }}
              size={GoogleSigninButton.Size.Wide}
              color={GoogleSigninButton.Color.Dark}
              onPress={this._signIn}
              disabled={this.state.isSigninInProgress} />
          </View>
          <View style={styles.buttonContainer}>
            {!this.state.loggedIn && <Text>You are currently logged out</Text>}
            {this.state.loggedIn && <Button onPress={this.signOut}
              title="Signout"
              color="#841584">
            </Button>}
          </View>
          {this.state.loggedIn && <View>
            <View style={styles.listHeader}>
              <Text>User Info</Text>
            </View>
            <View style={styles.dp}>
              <Image
                style={{ width: 100, height: 100 }}
                source={{ uri: this.state.userInfo && this.state.userInfo.user && this.state.userInfo.user.photo }}
              />
            </View>
            <View style={styles.detailContainer}>
              <Text style={styles.title}>Name</Text>
              <Text style={styles.message}>{this.state.userInfo && this.state.userInfo.user && this.state.userInfo.user.name}</Text>
            </View>
            <View style={styles.detailContainer}>
              <Text style={styles.title}>Email</Text>
              <Text style={styles.message}>{this.state.userInfo && this.state.userInfo.user && this.state.userInfo.user.email}</Text>
            </View>
            <View style={styles.detailContainer}>
              <Text style={styles.title}>ID</Text>
              <Text style={styles.message}>{this.state.userInfo && this.state.userInfo.user && this.state.userInfo.user.id}</Text>
            </View>
          </View>}
        </SafeAreaView>
      </View>
    );
  }
}


const styles = StyleSheet.create({
  listHeader: {
    backgroundColor: '#eee',
    color: "#222",
    height: 44,
    padding: 12
  },
  detailContainer: {
    paddingHorizontal: 20
  },
  title: {
    fontSize: 18,
    fontWeight: 'bold',
    paddingTop: 10
  },
  message: {
    fontSize: 14,
    paddingBottom: 15,
    borderBottomColor: "#ccc",
    borderBottomWidth: 1
  },
  dp:{
    marginTop: 32,
    paddingHorizontal: 24,
    flexDirection: 'row',
    justifyContent: 'center'
  },
  sectionContainer: {
    marginTop: 32,
    paddingHorizontal: 24,
    flexDirection: 'row',
    justifyContent: 'center'
  },
  buttonContainer: {
    marginTop: 32,
    paddingHorizontal: 24,
    flexDirection: 'row',
    justifyContent: 'center'
  }
});

export default App;
google 로그인 출처 :
[React-Native] 리액트 네이티브(react-native) 구글 로그인 연동하기
앱에서 사용자들이 간편하게 로그인할 수 있는 sns 로그인 연동은 필수인 것 같습니다. 저도 안드로이드로는 구글 로그인 연동을 해봤었는데 이번에 프로젝트를 진행하면서 리액트 네이티브로
bangc.tistory.com
----------------------------------------------------------------------------------------------------------------------
3. 페이스북
https://www.npmjs.com/package/react-native-fbsdk-next
react-native-fbsdk-next
Facebook SDK support for React Native apps.. Latest version: 7.3.3, last published: 14 days ago. Start using react-native-fbsdk-next in your project by running `npm i react-native-fbsdk-next`. There are 4 other projects in the npm registry using react-nati
www.npmjs.com
1. 설치
yarn add react-native-fbsdk-next
npm install --save react-native-fbsdk-next
2. 링크
React native 0.60 버전 이상이면 오토링크가 됩니다.
3. 설정
페이스북 developer 페이지를 따라서 프로젝트 설정을 해줘야 합니다.
developers.facebook.com/docs/facebook-login/android
Android - Facebook 로그인 - 문서 - Facebook for Developers
developers.facebook.com
드롭다운 메뉴에서 미리 등록해둔 앱을 선택하거나 새로운 앱을 만듭니다. 선택한 후에는 앱 ID가 표시된 것을 확인할 수 있습니다.

그 후 페이지에서 설명하는 내용들을 전부 프로젝트 내에 추가해줍니다.
build.gradle, strings.xml, AndroidManifest.xml 파일등이 수정됩니다. 문서 내의 4번 항목 (리소스 및 메니페스트 수정) 까지 진행하면 됩니다.


패키지 이름은 위처럼 AndroidManifest.xml 파일 내에서 확인할 수 있고, 기본 액티비티 클래스 이름의 경우 com.[패키지 이름].MainActivity와 같이 입력하면 됩니다.
다음 6번 항목은 키 발급입니다.
JDK의 keytool과 openssl이 필요합니다.
code.google.com/archive/p/openssl-for-windows/downloads
Google Code Archive - Long-term storage for Google Code Project Hosting.
code.google.com
JDK 폴더로 이동한 후, cmd창에서 다음 명령어를 실행해 줍니다.
keytool -exportcert -alias androiddebugkey -keystore "프로젝트경로\android\app\debug.keystore" | "openssl경로\openssl-0.9.8k_X64\bin\openssl" sha1 -binary | "openssl경로\openssl-0.9.8k_X64\bin\openssl" base64그러면 28자리의 해시된 키가 생성됩니다. 페이지 내에 입력하면 드디어 준비 끝입니다.
4. 코드 작성
react-native-fbsdk-next 에서 제공하고 있는 기본적인 로그인 예제 코드로 테스트 해 봅시다.
import React, { Component } from 'react';
import { View } from 'react-native';
import { LoginButton, AccessToken } from 'react-native-fbsdk-next';

export default class Login extends Component {
  render() {
    return (
      <View>
        <LoginButton
          onLoginFinished={
            (error, result) => {
              if (error) {
                console.log("login has error: " + result.error);
              } else if (result.isCancelled) {
                console.log("login is cancelled.");
              } else {
                AccessToken.getCurrentAccessToken().then(
                  (data) => {
                    console.log(data.accessToken.toString())
                  }
                )
              }
            }
          }
          onLogoutFinished={() => console.log("logout.")}/>
      </View>
    );
  }
};
실제로 실행시켜보면 미리 디자인까지 되어 있는 로그인 버튼을 확인할 수 있습니다.
로그인이 성공적으로 되는 것을 확인했다면 사용자 프로필은 다음과 같이 가져올 수 있습니다.
import { Profile } from "react-native-fbsdk-next";

// ...

const currentProfile = Profile.getCurrentProfile().then(
  function(currentProfile) {
    if (currentProfile) {
      console.log("The current logged user is: " +
        currentProfile.name
        + ". His profile id is: " +
        currentProfile.userID
      );
    }
  }
);
페이스북 로그인 출처 :
[React Native] Facebook 연동 Login 적용하기 in 안드로이드
2021년 1월 19일부로 Facebook SDK에 대한 페이스북의 공식 support가 종료되었습니다. 이제부터는 커뮤니티에서 관리를 하고 있습니다. 아래 링크에서 확인할 수 있습니다. www.npmjs.com/package/react-native-..
jnj1.tistory.com
정리 잘되있는 곳
https://surprisecomputer.tistory.com/157
[React Native] Facebook SDK(react-native-fbsdk) 적용하기
1. 서론 저번 포스팅에서는 Firebase Analytics를 설정하는 법에 대해서 포스팅했다. 이번에는 마케터 분의 요청으로 Facebook SDK를 설정하게 됐다. 그렇게 어렵지는 않지만 File.swift 파일을 생성하는 부
surprisecomputer.tistory.com
결국 페이스북 디벨로퍼에서 시키는데로 IOS / Android 환경을 구성 하도록 한다.
4. 네이버 로그인
https://github.com/react-native-seoul/react-native-naver-login
GitHub - react-native-seoul/react-native-naver-login: 리엑트 네이티브 네이버 로그인 라이브러리
리엑트 네이티브 네이버 로그인 라이브러리. Contribute to react-native-seoul/react-native-naver-login development by creating an account on GitHub.
github.com
1. 라이브러리 설치
npm install @react-native-seoul/naver-login --save
or
yarn add @react-native-seoul/naver-login
ios 의 경우 추가로 pod install을 수행하자.
cd ios && pod install && cd .. # CocoaPods on iOS needs this extra step2. 환경설정
ios 설정
- [info.plist] 파일 LSApplicationQueriesSchemes 항목에 아래 항목을 추가한다.
  <key>LSApplicationQueriesSchemes</key>
  <array>
    <string>naversearchapp</string>
    <string>naversearchthirdlogin</string>
</array>- [AppDelegate.m] 파일에 내용을 추가하자.
// for naver login
#import <NaverThirdPartyLogin/NaverThirdPartyLoginConnection.h>

. . .

- (BOOL)application:(UIApplication *)application
     openURL:(NSURL *)url
     options:(NSDictionary<UIApplicationOpenURLOptionsKey,id> *)options
  {
     . . .

     // for naver login
    if ([url.scheme isEqualToString:@"your_apps_urlscheme"]) {
      return [[NaverThirdPartyLoginConnection getSharedInstance] application:application openURL:url options:options];
    }

     . . .

     return YES;
  }
- Podfile 에 내용을 추가한다.
pod 'naveridlogin-sdk-ios'- Xcode 를 열어 Url Schemes를 넣어주자.
project > target > info > 하단에 URL Types 부분에 아래 내용과 같이 네이버 개발자 앱 등록 시 입력한 URL Scheme 을 입력한다.
android 설정
안드로이드의 경우 별다른 설정은 없다.
- app/build.gradle file => defaultConfig 에 applicationId가 셋팅 되어 있는지 확인하자.
- Build 과정에서 WrongManifestParent 에러 발생 시 (로그에 나오는 대로)아래 코드를 app/build.gradle 에 추가해 준다.
android {
    lintOptions {
        checkReleaseBuilds false
        // Or, if you prefer, you can continue to check for errors in release builds,
        // but continue the build even when errors are found:
        abortOnError false
    }
}- 깃헙에는 필요하면 AndroidManifest.xml에 아래 코드를 넣어라는데.. 넣을 필요는 없다.
<activity
  android:name="com.nhn.android.naverlogin.ui.OAuthLoginActivity"
  android:screenOrientation="portrait"
  android:theme="@android:style/Theme.Translucent.NoTitleBar" />
<activity
  android:name="com.nhn.android.naverlogin.ui.OAuthLoginInAppBrowserActivity"
  android:label="OAuth2.0 In-app"
  android:screenOrientation="portrait" />
3. 실제 사용
import React from "react";
import {
  Alert,
  SafeAreaView,
  StyleSheet,
  Button,
  Platform
} from "react-native";
import { NaverLogin, getProfile } from "@react-native-seoul/naver-login";

const iosKeys = {
  kConsumerKey: "naver client id",
  kConsumerSecret: "naver secret id",
  kServiceAppName: "테스트앱(iOS)",
  kServiceAppUrlScheme: "testapp" // only for iOS
};

const androidKeys = {
  kConsumerKey: "naver client id",
  kConsumerSecret: "naver secret id",
  kServiceAppName: "테스트앱(안드로이드)"
};

const initials = Platform.OS === "ios" ? iosKeys : androidKeys;

const App = () => {
  const [naverToken, setNaverToken] = React.useState(null);

  const naverLogin = props => {
    return new Promise((resolve, reject) => {
      NaverLogin.login(props, (err, token) => {
        console.log(`\n\n  Token is fetched  :: ${token} \n\n`);
        setNaverToken(token);
        if (err) {
          reject(err);
          return;
        }
        resolve(token);
      });
    });
  };

  const naverLogout = () => {
    NaverLogin.logout();
    setNaverToken("");
  };

  const getUserProfile = async () => {
    const profileResult = await getProfile(naverToken.accessToken);
    if (profileResult.resultcode === "024") {
      Alert.alert("로그인 실패", profileResult.message);
      return;
    }
    console.log("profileResult", profileResult);
  };

  return (
    <SafeAreaView style={styles.container}>
      <Button
        title="네이버 아이디로 로그인하기"
        onPress={() => naverLogin(initials)}
      />
      {!!naverToken && <Button title="로그아웃하기" onPress={naverLogout} />}

      {!!naverToken && (
        <Button title="회원정보 가져오기" onPress={getUserProfile} />
      )}
    </SafeAreaView>
  );
};

const styles = StyleSheet.create({
  container: {
    flex: 1,
    justifyContent: "space-evenly",
    alignItems: "center"
  }
});

export default App;
4. 네이버 open api 신청
네이버 로그인을 위해선 당연히 api 신청이 필요하다.

- 먼저 약관 동의 하고

- 계정 정보를 등록한다.

- 다음은 애플리케이션 이름을 입력하고 사용 API 부분에 사용하려는 기능을 선택한다.

- 이후 로그인 오픈 API 서비스 환경에서 Android , Ios 를 추가한다.
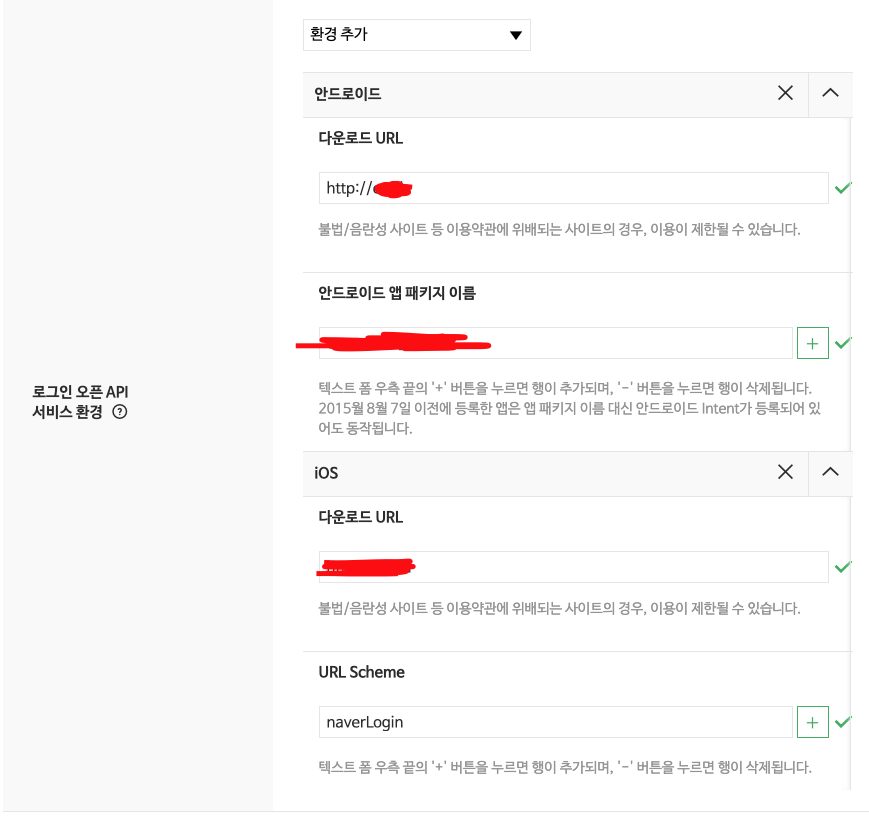
빈 공간에 적당한 내용을 채운다. 마지막에 ios의 URL Scheme 부분은 추후 Xcode에 들어가는 환경설정에 필요한 내용이다.
네이버 로그인 출처 :
https://velog.io/@pcsnms/Naver-Login
[React Native] Naver Login
자 이번에는 네이버 로그인을 연동해보자. 관련 깃헙은 여기다.카카오톡 로그인과 마찬가지로 react-native-seoul 이 곳을 사용한다.ios 의 경우 추가로 pod install을 수행하자.
velog.io
Appdelegate.m 정리
#import "AppDelegate.h"

#import <React/RCTBridge.h>
#import <React/RCTBundleURLProvider.h>
#import <React/RCTRootView.h>

#import <FlipperKit/FlipperClient.h>
#import <FlipperKitLayoutPlugin/FlipperKitLayoutPlugin.h>
#import <FlipperKitUserDefaultsPlugin/FKUserDefaultsPlugin.h>
#import <FlipperKitNetworkPlugin/FlipperKitNetworkPlugin.h>
#import <SKIOSNetworkPlugin/SKIOSNetworkAdapter.h>
#import <FlipperKitReactPlugin/FlipperKitReactPlugin.h>

//카카오톡
#import <RNKakaoLogins.h>

// 페이스북
#import <FBSDKCoreKit/FBSDKCoreKit.h> // <- Add This Import
#import <React/RCTLinkingManager.h> // <- Add This Import

// 네이버
#import <NaverThirdPartyLogin/NaverThirdPartyLoginConnection.h>

// 여기서 주의할 점은 추가하는 모든 헤더들은 반드시 #ifdef FBSONARKITENABLED 위에 존재해야 한다는 것이다.
#ifdef FB_SONARKIT_ENABLED


static void InitializeFlipper(UIApplication *application) {
  FlipperClient *client = [FlipperClient sharedClient];
  SKDescriptorMapper *layoutDescriptorMapper = [[SKDescriptorMapper alloc] initWithDefaults];
  [client addPlugin:[[FlipperKitLayoutPlugin alloc] initWithRootNode:application withDescriptorMapper:layoutDescriptorMapper]];
  [client addPlugin:[[FKUserDefaultsPlugin alloc] initWithSuiteName:nil]];
  [client addPlugin:[FlipperKitReactPlugin new]];
  [client addPlugin:[[FlipperKitNetworkPlugin alloc] initWithNetworkAdapter:[SKIOSNetworkAdapter new]]];
  [client start];
}
#endif

@implementation AppDelegate

- (BOOL)application:(UIApplication *)application didFinishLaunchingWithOptions:(NSDictionary *)launchOptions
{
#ifdef FB_SONARKIT_ENABLED
  InitializeFlipper(application);
#endif

  RCTBridge *bridge = [[RCTBridge alloc] initWithDelegate:self launchOptions:launchOptions];
  RCTRootView *rootView = [[RCTRootView alloc] initWithBridge:bridge
                                                   moduleName:@"Base_ReactNative"
                                            initialProperties:nil];

  if (@available(iOS 13.0, *)) {
      rootView.backgroundColor = [UIColor systemBackgroundColor];
  } else {
      rootView.backgroundColor = [UIColor whiteColor];
  }

  self.window = [[UIWindow alloc] initWithFrame:[UIScreen mainScreen].bounds];
  UIViewController *rootViewController = [UIViewController new];
  rootViewController.view = rootView;
  self.window.rootViewController = rootViewController;
  [self.window makeKeyAndVisible];

  //페이스북 로그인
  [[FBSDKApplicationDelegate sharedInstance] application:application
                       didFinishLaunchingWithOptions:launchOptions];

  // 네이버 로그인
  [[NaverThirdPartyLoginConnection getSharedInstance] setIsNaverAppOauthEnable:YES];

  return YES;
}

// sns 로그인 관련
- (BOOL)application:(UIApplication *)app
     openURL:(NSURL *)url
     options:(NSDictionary<UIApplicationOpenURLOptionsKey,id> *)options {

  // 카카오
 if([RNKakaoLogins isKakaoTalkLoginUrl:url]) {
    return [RNKakaoLogins handleOpenUrl: url];
 }

  // 페이스북
  if ([[FBSDKApplicationDelegate sharedInstance] application:app openURL:url options:options]) {
    return YES;
  }

  if ([RCTLinkingManager application:app openURL:url options:options]) {
    return YES;
  }

  // 네이버
  if ([url.scheme isEqualToString:@"your_apps_urlscheme"]) {
        return [[NaverThirdPartyLoginConnection getSharedInstance] application:app openURL:url options:options];
  }

 return NO;
}
// sns 로그인 관련

- (NSURL *)sourceURLForBridge:(RCTBridge *)bridge


{
#if DEBUG
  return [[RCTBundleURLProvider sharedSettings] jsBundleURLForBundleRoot:@"index" fallbackResource:nil];
#else
  return [[NSBundle mainBundle] URLForResource:@"main" withExtension:@"jsbundle"];
#endif
}

@end'React Native' 카테고리의 다른 글
| typeScript ) 자식에게 함수 전달. (0) | 2022.09.19 |
|---|---|
| react native new Map() 컬랙션 사용하기 (0) | 2022.09.15 |
| RN 프로젝트 이름 변경 (0) | 2022.03.14 |
| react native function Back Button 처리 (0) | 2022.03.14 |
| 투명 스크린 만들기 (0) | 2022.01.26 |